-
Notifications
You must be signed in to change notification settings - Fork 0
MultiHostMigration
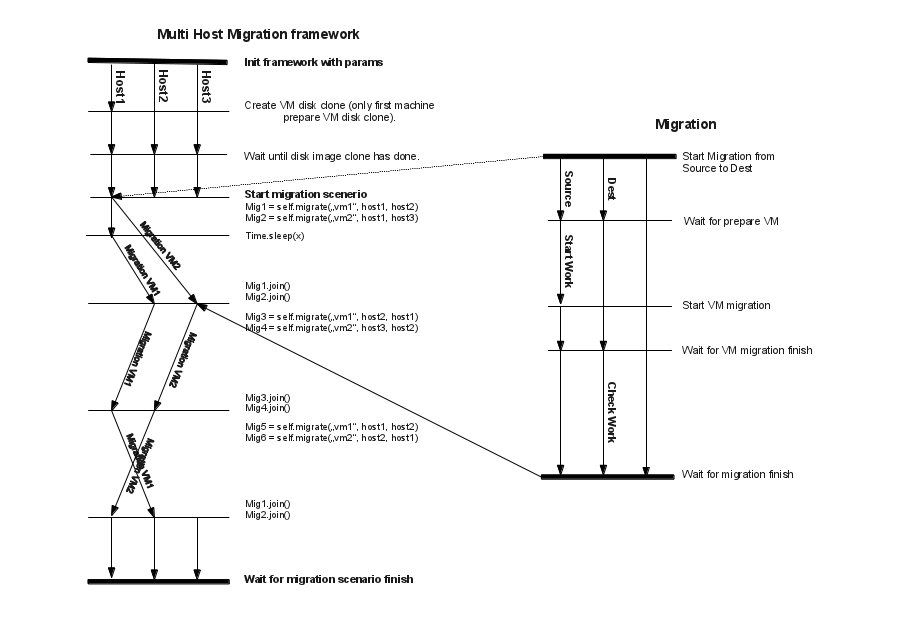
Client part of Autotest works only on a single host, for this reason multi host migration test needs to be started from the server part of Autotest. The server module is responsible for preparing all hosts, then to start client part with the appropriate parameters. To simplify writing a multi host migration, we developed the MultihostMigration class. The class is a framework class that allows to create, start and sync migration scenario over multiple host, taking care of most of the heavy lifting for you.
Multi host migration uses almost all the configuration files from standard virt
tests. The only difference the main configuration file, named
multi-host-tests.cfg. All multi host migration tests are defined in
subtest.cfg.
The server part of Autotest, just as the client part, uses a control file to
describe the operations to be executed on a test job. The multi host migration
control file can be found at client/kvm/multi_host.srv.
Starting autoserv:
Change your current working directory to the root of the autotest repo, say
/home/myuser/Code/autotest:
cd /home/myuser/Code/autotest
server/autoserv -m 192.168.100.220,192.168.100.240 client/tests/kvm/multi_host.srv
the command starts autotest on machine 192.168.100.220 and 192.168.100.240 and uses them for multi_host.srv control file. If four machines are defined it'll create two pairs and with each pair the independent migration test is started. Because of it there is added new arg "all" in multi_host.srv. It starts one migration test with all machines.
server/autoserv -m 192.168.100.220,192.168.100.240,192.168.100.221 -a all client/tests/kvm/multi_host.srv
 Multihost framework function
Source file for the diagram above (LibreOffice file)
class TestMultihostMigration(virt_utils.MultihostMigration):
    def __init__(self, test, params, env):
        super(testMultihostMigration, self).__init__(test, params, env)

    def migration_scenario(self):
        srchost = self.params.get("hosts")[0]
        dsthost = self.params.get("hosts")[1]

        def worker(mig_data):
            vm = env.get_vm("vm1")
            session = vm.wait_for_login(timeout=self.login_timeout)
            session.sendline("nohup dd if=/dev/zero of=/dev/null &")
            session.cmd("killall -0 dd")

        def check_worker(mig_data):
            vm = env.get_vm("vm1")
            session = vm.wait_for_login(timeout=self.login_timeout)
            session.cmd("killall -9 dd")

        # Almost synchronized migration, waiting to end it.
        # Work is started only on first VM.

        self.migrate_wait(["vm1", "vm2"], srchost, dsthost,
                          worker, check_worker)

        # Migration started in different threads.
        # It allows to start multiple migrations simultaneously.

        # Starts one migration without synchronization with work.
        mig1 = self.migrate(["vm1"], srchost, dsthost,
                            worker, check_worker)

        time.sleep(20)

        # Starts another test simultaneously.
        mig2 = self.migrate(["vm2"], srchost, dsthost)
        # Wait for mig2 finish.
        mig2.join()
        mig1.join()

mig = TestMultihostMigration(test, params, env)
# Start test.
mig.run()
When you call:
mig = TestMultihostMigration(test, params, env):
What happens is
- VM's disks will be prepared.
- The synchronization server will be started.
- All hosts will be synchronized after VM create disks.
When you call the method:
migrate():
What happens in a diagram is:
| source | destination |
|---|---|
| It prepare VM if machine is not started. | |
| Start work on VM. | |
mig.migrate_vms_src() |
mig.migrate_vms_dest() |
| Check work on VM after migration. | |
| Wait for finish migration on all hosts. | |
It's important to note that the migrations are made using the tcp protocol,
since the others don't support multi host migration.
def migrate_vms_src(self, mig_data):
    vm = mig_data.vms[0]
    logging.info("Start migrating now...")
    vm.migrate(mig_data.dst, mig_data.vm_ports)
This example migrates only the first machine defined in migration. Better example
is in virt_utils.MultihostMigration.migrate_vms_src. This function migrates
all machines defined for migration.